Tuesday 2 February 2016

Life Drawing week 8 (after a massive hiatus!)

I've finally returned to life drawing class after, I think, almost a year! It feels very much like starting again from scratch, but I think there was some decent work this week. We started with a ten minute pose (although that included getting set up etc.):


Overall, not bad for such a long layoff. Obviously I didn't get down to the lower legs, feet, or to detailing the hand. The knees and calves were very rushed so are really just place holders, and the right thigh was troublesome.
Next was a couple of of short gesture poses, which instead of using to rough out a full figure, I used to capture quick important details:


The top pose is kind of a mess but at least captures the twist in the torso to some extent. The bottom pose suffers from poor perspective with the lower legs again, and in fact overall has issues of proportion.
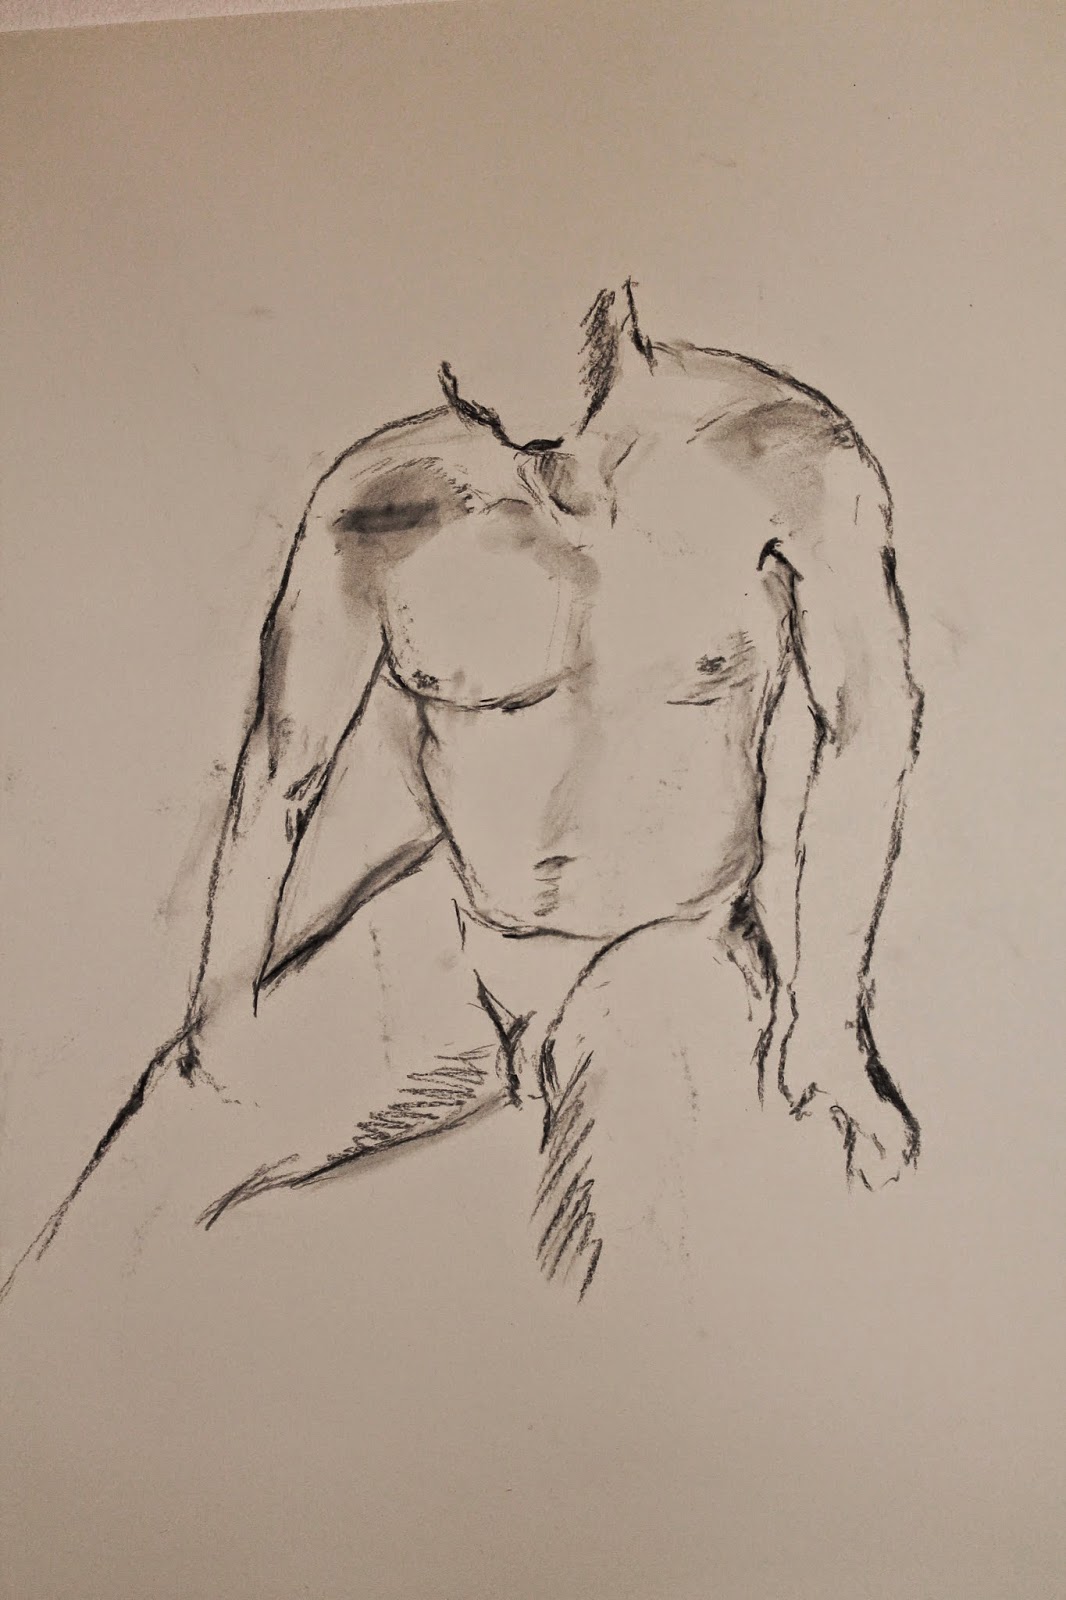
After this came a longer seated pose before the break, around 20 minutes:


The most glaring issue is the mess of a left foot, which is a shame as if I'd managed to use the ankle to suggest the twist in the lower leg it could have worked quite well. Unfortunately the class was ridiculously full and I could barely see it! The back of the knee, with more detail, could have worked. The torso has issues as regards the shoulder placement and effect that has on the back, but could have been refined by bringing the right arm in a bit and having more detail on that elbow. I do like the transition from hip to upper thigh on the left leg though, I think it captured the muscle tensing quite well. I was aiming for a kind of sketchy, hightened approach rather than a strict realism which I think the piece sort of has. It will need work, though.
After this, we restarted the second half with a 10 minute pose:


 The pose itself was quite unusual, given how little of the model I could see, so I started from the face and worked outwards, trying to use the minimum of information to suggest the pose. The left shoulder is too rounded, and the upper arm sits strangely on it. The left hand is too big, and the right hand barely made it on to the page. The upper right arm is too small, so the foreshortening needed to be better indicated. Still, it was OK for such a short pose.
Next up were a few short gesture poses, only two of which I really got anything on the page for:


Due to the layout of the room some poses were very difficult to see. I quickly sketched this in as I intended to exaggerate the perspective as a bit of an experiment. I would have liked a bit more time to get this pose down as it was very interesting, but, alas, it was only a 3 minute pose. Next was a slightly longer pose, I think 7 or 8 minutes:


I was pretty happy with this. The right thigh is a little narrow and having time to try and at least sketch in the top of the left shin would have really helped it be more evocative but for the short time I had, I was pleased with what I came up with. Finally, a 25 minute sitting pose:


Both models were seated high for us to sketch but given how slow I am at this, I thought it was best to concentrate on one! Perhaps the waist is a bit narrow, although the model was very slim so it seemed to check out at the time. The angle of the right forearm was a trial to get right and I still dont; think it is, so it and the right hand look small. The left leg looks too big, too high and dominant, but I think the pose shifted slightly along the line and I didn't adjust to it properly. I used a different technique here than elsewhere though, drawing out in pencil first, and using a charcoal pencil, grey tones compressed charcoal and willow charcoal in various places to get the effect I wanted quickly. When time was drawing to a close I quickly marked out where I wanted to shade and filled some in when I returned home as well, again, time was not on my side.

Not bad though, there are two or three pieces here I like and would say are better than previous work I have done in the class, which is pretty decent considering how out of practice I am. Hopefully this will be much more regular now.

Sunday 17 January 2016

New figure study

It's been a long time since I was last at life drawing class and I fear I'm getting rusty, so I want to get back to charcoal figure study practice to ensure I stay in some sort of shape in case I receive any more commissions.
I can't remember where I found the photograph of this pose but I was really drawn to the lighting, with those dramatic shadows across the back, the chance to practice both a front and back pose simultaneously, and the unguarded, slightly vulnerable pose. It didn't have the dramatic arching or dancer's poise that some of the others did, but just seemed very natural, almost documentary, which I found much more interesting than the more classical poses I have used before and seen elsewhere.

The final piece is A3 on paper, in Derwent charcoal pencil and grey shades compressed charcoal sticks. The mirror background is black acrylic paint and the mirror frame is C. Roberson & Co metallic pale gold acrylic paint, accented with charcoal pencils.

Wednesday 13 January 2016

Wedding present commission number 3 (I think!)

I was asked to create a wedding gift but had minimal reference suggestions, other than the couple's invitations, which had a 1920s Art Deco theme. I also only had a few photo references to use, so having chosen the clearest image, I took a few practice runs at it. As I only had mobile phone images, I went with an illustration style that allowed for a lack of detail, so black ink linework with grey and white charcoal on toned paper. I thought this would allow for a big enough final piece to feel like a significant gift, and would feel a bit like a minimalist, modern update to the bold illustrative style of the '20s.
Once the illustration was sorted, it felt bare, so I sourced a large wallpaper sample from 1924 from Etsy and decided to decoupage the illustration on top of that and mount the piece in a box frame. I cut the piece out in a diamond and overlaid that on both a white and black mount to allow it to stand out from the similarly coloured background wallpaper. I hand wrote the bride and groom's names in an era-appropriate font in black ink and painted the inside of the lettering with gold acryilic.
The date of the wedding was written up and mounted in the same style as the illustration. The whole thing was double mounted and framed in a deep box frame. Finished size of the piece is 20" x 16" frame for a 15" x 10" final image.


Monday 10 August 2015

Wedding commission number 2!

This one is very close to my heart, as my wedding present to my brother and now sister-in-law was to create their wedding invitations, dinner menus for the big day, and other assorted artwork to give their event a personalised, handmade quality.
They had already put in so much work to make their day exactly as they wanted it, so I had to create work which would fit the theme that was emerging. That theme was somewhere between a music festival and a village fete. So, in the early days when the Save The Date notices were being sent out, I tried to create a very bold, simple take on a 1960s music festival poster. Which meant balloon text, plenty of colour, and a kind of cartoony riff on art nouveau-style arches of text and image.


The design was created in one go in simple black ink on white bristol board at A4 and then scanned and reduced to A5. The colouring was all done, infuriatingly slowly, just using a mouse in the photo editing package GIMP 2.0. The textured paper background was added by layering the coloured image over an existing textured stock image and creating a transparent colour. The kind of guiding principle was a loose theme of 'day and night', to carry on the festival vibe, so the text on the left hand side has a blue through green colour scheme, surrounding a cartoon sun, and the text on the right ran through red and purple tones around a cartoon moon. Little details like the block capital text and stars were included to keep it from straying too far towards childlike, and mirrored the Haight-Ashbury style posters I was referencing.

The invitations themselves were a bit of an excuse to experiment, to push the theme of the Save The Dates a little further and create something totally unique. It was also a way to introduce some physical artwork which I hoped to carry over in to the wedding itself. I bought a large roll of craft paper (carrying over from the textured paper backdrop of the Save The Dates) and drew out another cartoony art nouveau style arch frame, this time filling the rest of the page with a slightly acid-inspired sunflower motif (another request from the bride). The arches and sunflowers were all drawn with chalk pastels, on a large scale, then photographed and resized for the A5 invites. The idea being that for things like the running orders or direction signs for the big day, I would be able to inexpensively create them on the spot with similar design work and there would be a thematic visual link throughout.
The next task was to create, in ink on bristol board, the names of the bride & groom in a hand drawn hippy-esque font. Once this was photographed and posterized, I used an abstract pastel drawing of an evening sky (which I had tweaked to make as vibrant and dramatic as possible) and created a clipping mask to use that as the fill image for the text. Once I had that, I created another transparency and pasted that over the chalk-drawn poster. I used the petals and corollae of the sunflowers to paste text for the date of the wedding, which was coloured to match the overall design that was emerging. This poster was then superimposed on to a brick wall, just to differentiate it from the Save The Dates a little more and to make it seem a little rougher, like a real gig/event poster.


Next we needed something to put on the front of the service order for the church. While still wanting to continue the themes we had developed, I needed to be a bit more restrained so took a completely different approach. I went to the church and took a lot of reference photos. From these, I picked one which showed the church from the perspective of the duck pond just opposite, nestled amongst the trees there. I created two different pastel images; one a very traditional, slightly naive landscape drawing in daylight, the other a more abstract image in sunset tones of red, pink, purple etc. (to continue the day to night theme). I created a clipping mask using the bride and groom's names and used the bold colours of the abstract image to make the text visible over the landscape image without having to use outlines. I added a very simple line of white text for the date of the wedding.


Last, but not least, I was asked to come up with a bold, simple portrait of the couple to display. Now, this went through a LOT of various iterations, from superheroes to Simpsons characters, before the bride's love of cats won the day. My idea for this image was to create a kind of a spoof on Royal Wedding memorabilia, those odd tea towels and mugs that sit threadbare or coffee stained in your royalist aunt's cupboards. Instead of a stiff portrait of young bluebloods, we used cartoon cats in wedding attire. The rest of the design was created very much on a first draft, just an evening of sitting and seeing what came out in terms of freehand font design and creating a fussy, self-consciously gaudy border design. My plan was to keep the lines bold enough that it could be a tattoo design or something from a vintage zine, which was my way of keeping it from becoming too saccharine and losing the comic effect of the absurdity of the image. This image was framed and took up residence first next to the wedding cake display, and later in the day next to the wedding guest book. Copies were printed up and used in the running order and table plan, and some have been given as gifts. 


The text was then isolated using GIMP and resized to use as a header on the wedding menus. The menu was simply a Word doc made using a custom font downloaded from Font Squirrel called Inknut Antiqua. I loved it's slightly irreverent, off-kilter take on a formal font, it seemed to capture the tone we were looking for, and it was in fact a holdover from the church order of service cover design. They were printed on to thick, off-white paper so they could be propped up on miniature easels on the dinner tables.


I loved having the opportunity to be so involved in their big day, and to be able to work on one project over a long time and develop ideas and themes that could develop. It was also a great excuse to learn a few new techniques, get some practice in old techniques, and collaborate with a 'client' safe in the knowledge that we could be honest with each other when things didn't work and be given reign to experiment on my own terms while still aiming to give them what they wanted.

Tuesday 5 May 2015

Latest commission - wedding comic!

I was recently commissioned to do my most ambitious piece, a two page framed comic that a bride-to-be wanted to give to her groom on their wedding day. The comic was to include anecdotes and incidents from their lives, and it had to feature a cameo from Judge Dredd (his favourite character)!

The first thing I did was meet with the client to talk about what events or stories were going to be included. I got as much information as I possibly could, so I'd have plenty of material to whittle down to two pages. While we talked, and after, I was starting to form the idea of how to structure the panels. I started designing the layout, and once I was happy with that I wrote a script for the narrative text boxes and speech bubbles. I decided early on to adapt the stories as if they were simple adventure tales, so for example a holiday that included a tricky day out on a tandem bike became a struggle against sentient killer tandems, or a whale watching holiday would now be the two of them patrolling the seas in full karate pose, ready to fight off evil-doers and whale poachers.

While the recipient was a Judge Dredd fan, he was also a DC Comics fan, and considering the subject matter I thought the visual style of Golden Age or Silver Age DC would be a better fit than the grimmer, violent, noirish 2000AD style. Taking my cue from Dick Dillin-era Justice League comics which I had in trade paperback, I mapped out the exact dimensions of the pages which allowed me to size out each individual panel. I then used this framework to draw up a rough of the final piece, just to decide placement etc. The title, Nerd Mag, was another in-joke.

(Click pictures to view)

Then I picked up some Bristol board and doubled the dimensions of the pages above so I could include more detail (a technique that I only learned about when visiting comic conventions and seeing how real artists put their pages together). I asked the client to provide me with any photographs she could, so I could at least make a decent attempt at a likeness, and luckily these days pretty much everybody has a sizeable cache of photographs. Many of them were from the holidays that I was drawing, although I was much more concerned with representing the stories as cleanly and simply as possible. First, I laid down the frames in pencil, then inked them, then started pencilling the artwork. After that, I inked the panels ready for colouring. Where needed, I found it easier to write up text on separate sheets and glue them in place over the art work, to try and cut down on any mistakes.


I would have been tempted to colour digitally, in order to minimise the possibility of making mistakes that would be hard to correct given the relatively short turnaround time I had to put this together, but since I don't have a drawing tablet and my computer set up is pretty basic, I decided to take a chance and colour everything using Copic and Promarkers. From there, it was sent to a scanning/printing shop in London Bridge, Colourcentric, who did a great job of resizing and printing the work. They evened out the colouring as well, which was important in ensuring the finished piece looked convincing enough to pass as a real comic. In the future, I'd prefer to do this part myself, but the finished boards were just larger than A3 and large format scanners are tough to come by, and because of time pressures I was happy for someone else to turn this all around within a day.

Next up I scoured Orbital Comics looking for something very specific: a comic in to which I could staple my pages and have it look like it belongs. This was harder than expected, as the comic couldn't be too old, as the comics pages would be the wrong colour, or too recent, as my pages' white gutters would stand out against most comics these days which have a tendency to print in colour right to the edge of the page. In the end I found one which fit the bill, and loosened the staples and took it apart. I had two copies of my artwork, and stapled the two pages opposite each other with one or two pages in between so it would look more natural.


You can see above a disparity in the skin tones; the printing process had left them a little to pale so I used the same skin toned Copic I had before to put that colour back in. The page on the right is finished, the one on the left is in progress.

Finally, I had bought a large box frame in which to mount and display the comic. Using superglue, I pasted the back cover flat and the front cover slightly raised, so even though it was mounted vertically, it would look like it had been left open on a flat surface while being read. Each page was then carefully glued to the one below.


One minor speed bump was that, because I essentially had two identical pages fully stapled in, I accidentally ended up displaying the non-coloured pages rather than those I had retouched! After taking these photographs I punched up the skin tones on this version.

All in all I'm proud of the end result. I would maybe have liked to dwell more on the pencilling but the time limit I was given to finish actually helped me be less obsessive about the artwork. I think it captured the right tone, the right kind of lighthearted fun. And, it means a lot to think that I'll have work on somebody's wall from one of the most important days of their lives.


Friday 27 February 2015

Life Drawing week 7

A few false starts trying to use pencil left me reverting to charcoal sticks this week. For whatever reason, it felt like I was even slower at getting the gesture poses down than normal. Too much time on the torsos, not enough on blocking out the rest of the figure.


Some doodles, essentially, trying to mess around with line economy, seeing what is essential to the drawing and how to create depth without heavy shading.

I actually really liked the dimensions here but again got caught out with time trying to perfect the back before moving on.


Unfortunately this took some heavy charcoal transfer from another drawing on the way home, but again I quite liked the overall shape. The left leg especially seemed to work well.

The redrawn line of the stomach was a huge readjustment; I held a pencil up to the angle, transferred that across and drew the diagonal line you see from the armpit down, which made me change up the rest of the drawing.

This longer pose took a huge amount of time to get underway and still has some glaring issues, which may have been fixed by including more detail. I didn't really capture the part-turned chest. There's not much to this one, really.

The second model's approach to gesture poses was much more energetic, which really helped lossen up my approach. Even though I don't feel like these were 'good' drawings, at least I was unafraid to just attack the page.

I liked the way these were going, and would have like a couple more minutes to get the legs on and see whether I could represent the weight distribution.

The last piece felt a little disjointed, the arms were too big and I think the angle from which I was looking foreshortened the legs a little and I didn't readjust. Or perhaps it's just the right leg, and if I'd have made it clearer that it was stepping forward the mismatch in the foot position wouldn't have been as bad.
Overall a bit of a stalling week, although I have learned that I should just start the session by loosening up and not worrying out any final product. Again, too cautious.


Tuesday 17 February 2015

Charcoal Practice - full study

As much as I enjoy the life drawing classes I often find myself frustrated at not being able to follow through, to finish the drawing to a state where I'm happy with it. Obviously that's the point, to work under pressure and get faster by necessity, but I felt a little pent up last night at not really making the most of the session, so sat down with a reference image from artmodeltips.com and, using Canford Dreadnought Grey paper and a set of compressed charcoal sticks I spent approx. three hours on this piece.

(Click to view large)
It took some getting used to; I think I must have spent at least an hour messing around with the sticks and struggling with the tone to use on the stomach area. I'm still not totally convinced, and think that's the most problematic area, but I think it at least has texture and believable roundness. The shading on the upper chest, under the chin, also caused untold issues. In the end, I felt that I was in danger of tinkering the piece in to oblivion, so I shaded once more and moved on. The left hand seems a little small but when checked against the reference photograph it seemed OK, so perhaps it's just the angle that it is being held at foreshortening it. perhaps by making the fingers taller it would have suggested that better. The foot was an area where, once I had a likeness to a foot, I backed away for fear of ending up with a slab of confused charcoal mush.
I like the highlights; always the best part of using any toned paper. The point of the upper back/shoulder especially helps offset the picture and the hot highlights on the thighs stops it degenerating in to a samey tone of mid greys. I purposely chose not to use a black and white image, or to filter it to black and white, as I may have done in the past, and as I want to force myself to interpret the light as it is rather than using too many assists. A practice like this is only useful if it has some challenge to it.

(Click to enlarge)
Background added just using tonal shades and a lot of smudging


The other challenge was how long it took to dig all the charcoal out of my pores.